
Ultimate Guide to Shopify Variant Attributes
When selling products with multiple options like size, color, or material, organizing these variations effectively is key to improving the shopping experience. Shopify allows you to consolidate these options into a single product listing, simplifying inventory management and enhancing customer navigation.
- Variant Attributes: Shopify supports up to three options per product (e.g., Size, Color, Material) and up to 2,048 unique variants. Each variant can have its own price, SKU, inventory, and images.
- Why It Matters: Well-structured attributes improve SEO, streamline filters, and reduce abandoned carts by helping customers find what they need quickly.
- Managing Variants: Use tools like the bulk editor for updates or metafields to add detailed specifications like measurements or technical details.
- Display Tips: Highlight options like Size or Color with dropdowns or visual swatches. Ensure dynamic updates for price, media, and availability when a customer selects a variant.
- Avoid Common Issues: Regularly audit for inconsistent naming, missing attributes, or overly complex filters to maintain a smooth shopping experience.
This guide covers how to create, manage, and display Shopify variant attributes effectively, helping you keep your store organized and customer-friendly.
How to Add Variants on Shopify | Step-by-Step Product Options Guide (2025)

sbb-itb-e8e54fb
Creating and Managing Variant Attributes
Shopify allows you to define options (like Size, Color, or Material) that generate specific variants (such as Small/Red). Keep in mind that Shopify supports a maximum of 3 options and 100 variants per product.
How to Add Variant Attributes
To add variant attributes, log in to your Shopify admin, go to Products, and select the product you want to edit. Scroll to the Variants section and click + Add options. You'll be prompted to name the option (e.g., "Size") and input its values (e.g., "Small", "Medium", "Large"). Once this is done, Shopify automatically creates all possible variant combinations.
Each variant can have its own unique details, such as pricing, SKU, barcode, inventory, and images. Additionally, you can use the Cost per item field to track unit costs internally - this information is not visible to customers but helps calculate profit margins within Shopify analytics. If you're running a sale, the Compare at price field displays the original price with a strike-through, alongside the current price.
You can rearrange the display order of options by using the drag-and-drop handles (⋮⋮). For example, an apparel store might prioritize "Size" over "Color", while a furniture store might display "Material" first. Moreover, you can connect variant options to category metafields. This allows for reusable data entries - if you rename a color (e.g., from "Black" to "Graphite"), it updates across all related products automatically. If your theme supports it, this also enables features like color swatches on your storefront.
Now, let’s explore how to efficiently update multiple variants at once using Shopify’s bulk editor.
Bulk Editing Variant Attributes
For updating several variants simultaneously, Shopify’s bulk editor is an efficient tool. From a product’s details page, check the boxes for the variants you want to modify, then click Bulk edit. This opens a table view where you can quickly adjust details like prices, SKUs, inventory levels, or shipping weights across all selected variants. Use keyboard shortcuts (Shift/Alt/Command + Click) to select multiple cells faster. You can even drag the fill handle to copy a value across multiple rows.
However, the bulk editor performs best with smaller batches - around 500 variants or fewer. Editing larger sets can strain your browser and lead to crashes. To avoid this, filter your products to work with smaller groups or export a CSV file for offline editing. Always back up your data by exporting a CSV before making bulk updates. For stores managing extensive catalogs, note that Shopify enforces a daily upload limit of 1,000 new variants via app or CSV (this limit doesn’t apply to Shopify Plus plans).
These tools make it easier to keep your catalog up to date and prepare you for more advanced variant management.
Using Metafields for Advanced Variant Management
What Are Variant Metafields?
Variant metafields are like extra data fields that let you add more detailed information to each product variant beyond the basics like Size, Color, or Material. These are especially handy for giving customers extra context about their choices. For instance, if someone selects "Large" for a shirt, a variant metafield could show the exact chest measurement, making the decision easier without cluttering the options with another dropdown.
Each metafield consists of three parts: an identifier, a value, and a type (like text, number, or file). This setup allows you to store a variety of data types, such as dimensions, weights, dates, rich text, or even file attachments like PDFs or images. In fact, research shows that 76% of shoppers are more likely to buy when they see detailed, relevant specifications for their needs. Kat, a Product Management Specialist at MeldEagle, sums it up well:
"If the information should change when a customer selects a different variant, it belongs in a variant metafield".
Let’s look at how to set up these metafields in Shopify.
How to Set Up Variant Metafields
Creating variant metafields in Shopify is a simple process. Start by going to Settings > Custom Data > Variants in your Shopify admin. From there, create a new definition and give it a clear, descriptive name. Shopify will automatically generate the namespace and key (e.g., custom.processor). Be sure to select the most precise data type available - choosing "Weight" instead of "Single line text", for example, ensures you benefit from built-in features like unit conversion and validation.
If you want customers to see this information on your storefront, enable the Storefront API access option. Otherwise, leave it off to keep the data internal. You can also set up validations, like character limits or minimum/maximum values, to maintain consistency. After saving your definition, go to the Variants section on any product page, select a specific variant, and assign values to your new metafield.
Once your metafields are ready, you can decide how and when to use them for more precise variant details.
When to Use Variant Metafields
Variant metafields are perfect for adding specific details to variants without creating extra SKUs or overwhelming customers with too many options. They work well alongside core attributes, offering more flexibility and customization.
Take a computer hardware store, for example. Variant metafields can display processor speeds for different configurations, helping customers make informed decisions without sifting through endless options. Similarly, a clothing retailer could use metafields to show exact dimensions for each size, like "Small: 36 inches" or "Medium: 38 inches." This not only simplifies the shopping experience but also reduces returns and builds trust.
Other practical uses include listing variant-specific ingredients - like "Vanilla oil" for one candle scent and "Lavender oil" for another - or sharing technical specs that vary by hardware, such as battery life or graphics card details. By using metafields for these secondary details, you avoid the problem of "variant explosion", where too many combinations overwhelm shoppers or exceed Shopify's limits.
Displaying Variant Attributes on Your Storefront
Default Variant Attribute Display
When a product page loads, Shopify shows the variant specified by product.selected_or_first_available_variant. This means it will display either the variant included in the URL or the first available one in stock. This setup ensures that shoppers immediately see the correct price, media, and selector state.
To direct customers to a specific variant, you can use deep links by appending ?variant=[id] to your product URL. For example, if you're promoting a "Navy Blue, Large" t-shirt in an email, the link will take shoppers directly to that variant's image and price. This approach minimizes confusion and provides a smoother shopping journey right from the start.
For a better user experience, display product options like Size, Color, or Material as separate elements instead of combining them into a single dropdown. By using the product.options_with_values object in your theme code, you can create distinct selectors that let customers view all options at once. This reduces the number of clicks and makes selections more straightforward.
While the default setup determines the initial display, dynamic updates ensure the page adapts seamlessly as customers interact with it.
Adding Dynamic Updates
When a shopper selects a different variant, your storefront should dynamically update the product's media, price, and availability - without requiring a page reload. Shopify's developer documentation emphasizes this, stating:
"Regardless of the approach you use for variant selection, you need to ensure that when a new variant is selected, the product media and price are updated to reflect the selected variant".
JavaScript is key to making these updates happen. Many modern themes, such as Dawn, come with an onVariantChange function in their global.js file that automates these updates. You can also customize this function to include additional logic, like updateSelectedSwatchValue, which can dynamically refresh color swatches, background styles, or metafield displays.
For better visual feedback on availability, use CSS to style sold-out options with semi-transparent overlays or crossed-out lines, so customers can instantly see what's out of stock. Adding a title attribute to swatches can also provide helpful tooltip information.
These dynamic updates are essential for creating a smooth and intuitive shopping experience, helping customers make informed decisions as they browse.
Maintaining Consistent Variant Attributes
Keeping variant attributes consistent is crucial for ensuring your filters work smoothly. When these attributes are inconsistent, the shopping experience on your storefront can take a hit without any obvious errors. As FacetGuard aptly puts it, "Filter issues often don't look like errors - they look like 'the storefront is weird today.'" For instance, a shopper might see both "Color" and "Colour" as separate filter options, or filters might disappear entirely on certain collection pages. Below, we’ll dive into some common problems and how to identify and fix them.
Common Variant Attribute Problems
Inconsistent variant attributes can create several challenges. For example:
- Minor naming differences: Variations like "Color", "Color:", and "Colour" can split filter coverage, leaving customers confused and frustrated.
- High cardinality: This happens when an attribute has too many unique values. For instance, if your "Color" filter includes dozens of slightly different shades, it can overwhelm shoppers or even cause filters to disappear due to system limitations.
- Coverage gaps: Missing attributes or metafield values can lead to incomplete filter results. For example, if some products don’t include a "Large" size, customers filtering for that size might miss out on relevant items.
- Overlapping filters: When a product qualifies for multiple filter values (e.g., being available in both Red and Blue), it can create confusing intersections, making the filtering process unpredictable.
Auditing Attributes with FacetGuard
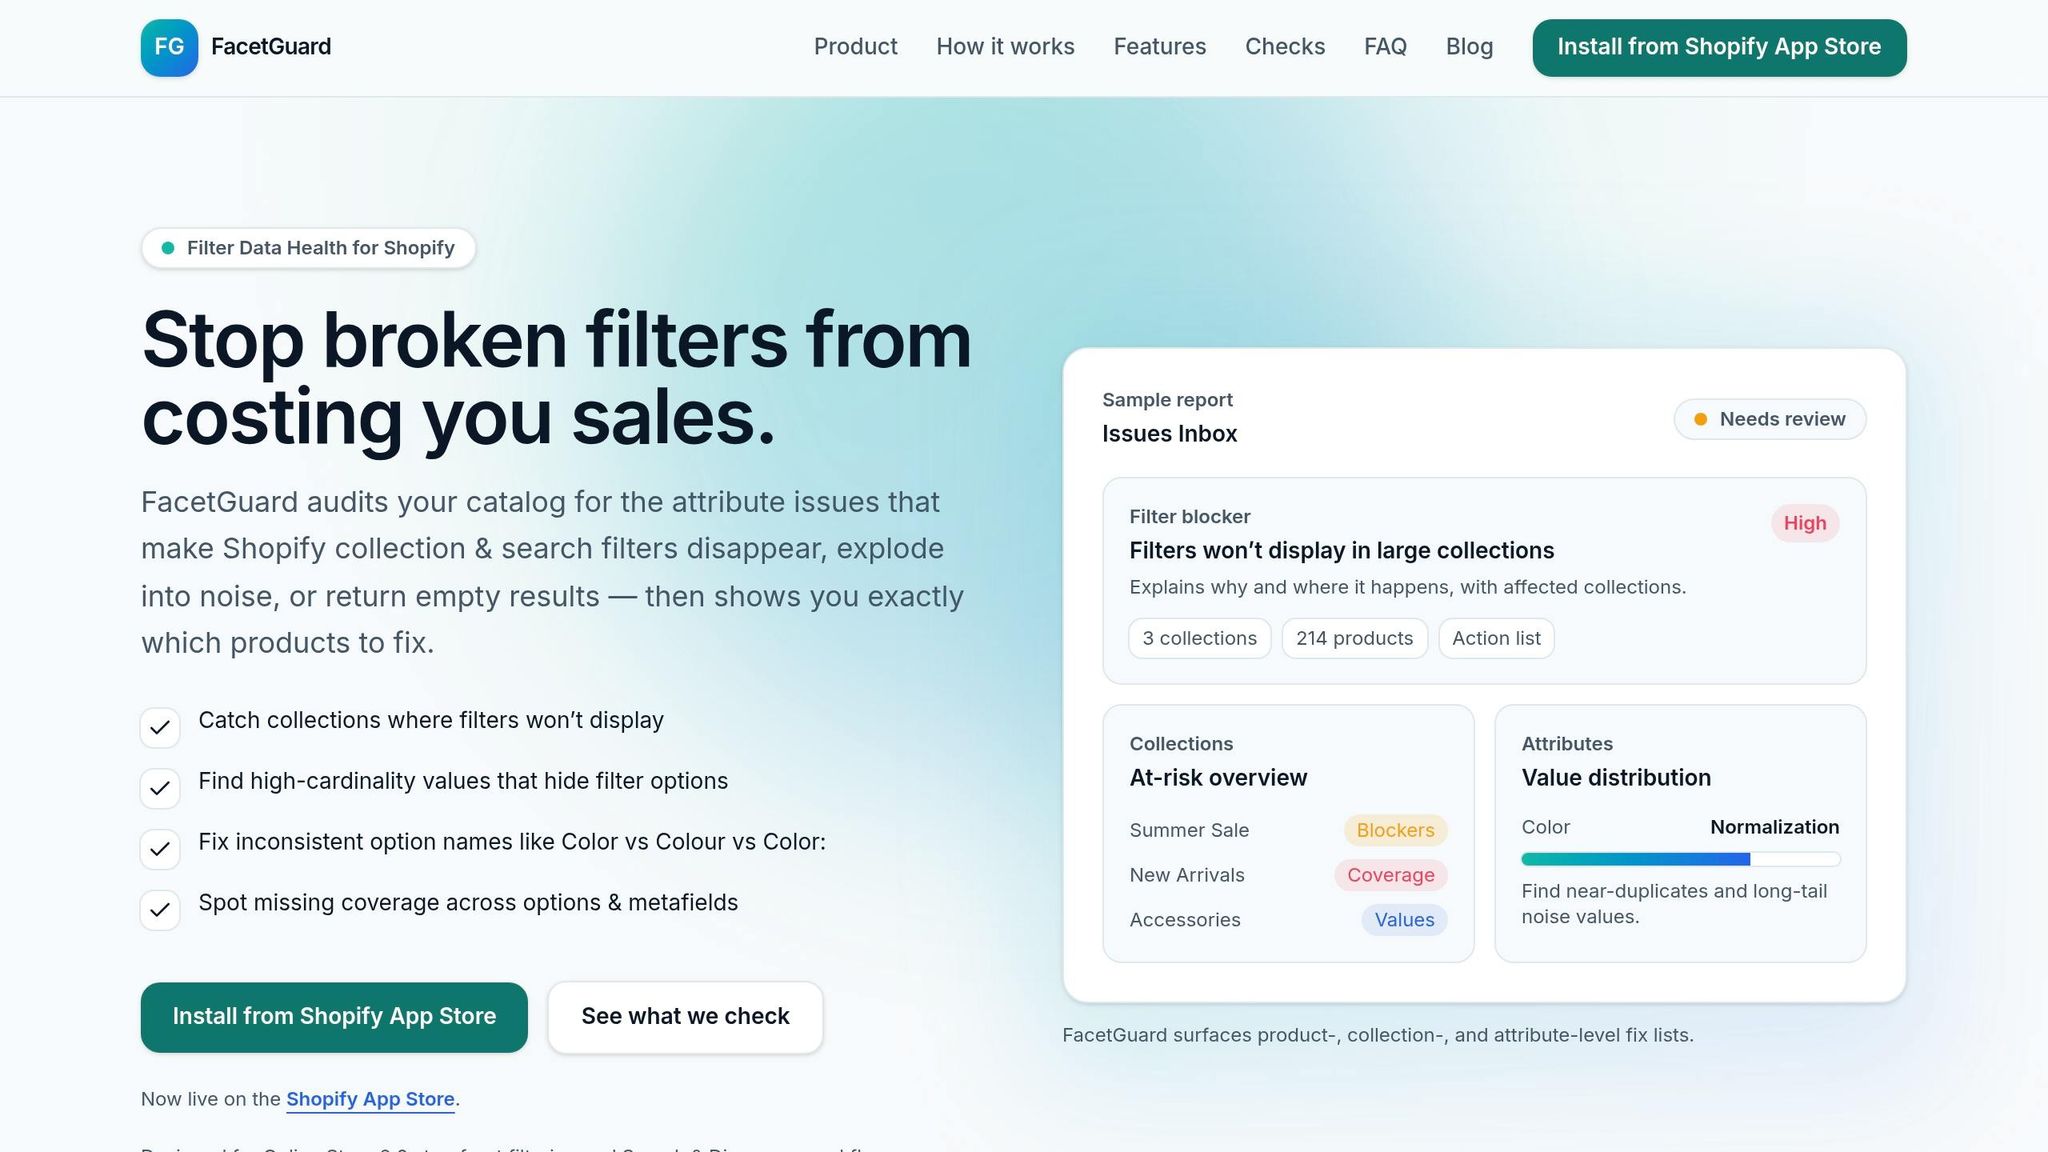
FacetGuard provides tools to help you identify and resolve these issues effectively. Here’s how they can help:
- Issues Inbox: This feature lists filter-related problems by severity, showing which products and collections are affected. It saves you from manually searching through your catalog and helps you focus on the most pressing issues.
- Filter Blockers Scanner: This tool identifies large collections or search contexts that exceed Shopify's size thresholds, which can cause filters to disappear. It explains the technical reasons for these blockers and suggests solutions, like splitting oversized collections or reorganizing your catalog.
- Attribute View: This feature allows you to analyze specific attributes, such as Color or Size, to find and merge duplicates. It highlights normalization issues, shows value distributions, and lets you export affected products into a CSV file. This makes it easier for your merchandising and operations teams to clean up inconsistencies. For example, if you need to rename "Black" to "Graphite", the system can automatically update all connected products across your store.
Best Practices for Variant Attributes
Shopify Variant Attributes vs Metafields Comparison Guide
Managing variant attributes effectively is all about keeping things straightforward - both for your customers and your backend systems. Simplicity ensures a smooth shopping experience while avoiding unnecessary complexity.
Choosing Between Core Attributes and Metafields
Focus your core variant attributes on the 1–3 key options that matter most to your customers. These are typically things like size, color, or material - attributes that influence pricing and need separate inventory tracking. As Kat from MeldEagle puts it:
"Variants should be reserved for 1-3 critical options that customers actively choose between, significantly affect pricing, and require distinct inventory tracking".
For other details, use variant metafields. These are perfect for secondary specs like processor speed, battery life, or specific size measurements. For example, shoppers are 76% more likely to buy when they see detailed specs that match their needs. However, these details don’t need to clutter your variant options.
You can also streamline your store using category metafields. These act as a centralized hub - update "Black" to "Graphite" once, and it’s reflected across all connected products automatically.
Creating Clear Variant Titles and Visuals
Keep variant titles descriptive and easy to understand. Avoid technical terms that might confuse your customers. Instead, make it obvious what sets each option apart. Pair text dropdowns with visual tools like color swatches or dynamic images that change as customers explore different variants.
For fashion retailers, providing precise measurements for each clothing size via variant metafields can boost conversions by 24%. The trick? Ensure the information updates dynamically when a customer switches sizes, like from Medium to Large. You can also pin frequently updated metafields in the Shopify admin to make management faster and reduce the chance of missing important updates.
Here’s a quick breakdown to help you decide when to use core variant attributes versus metafields.
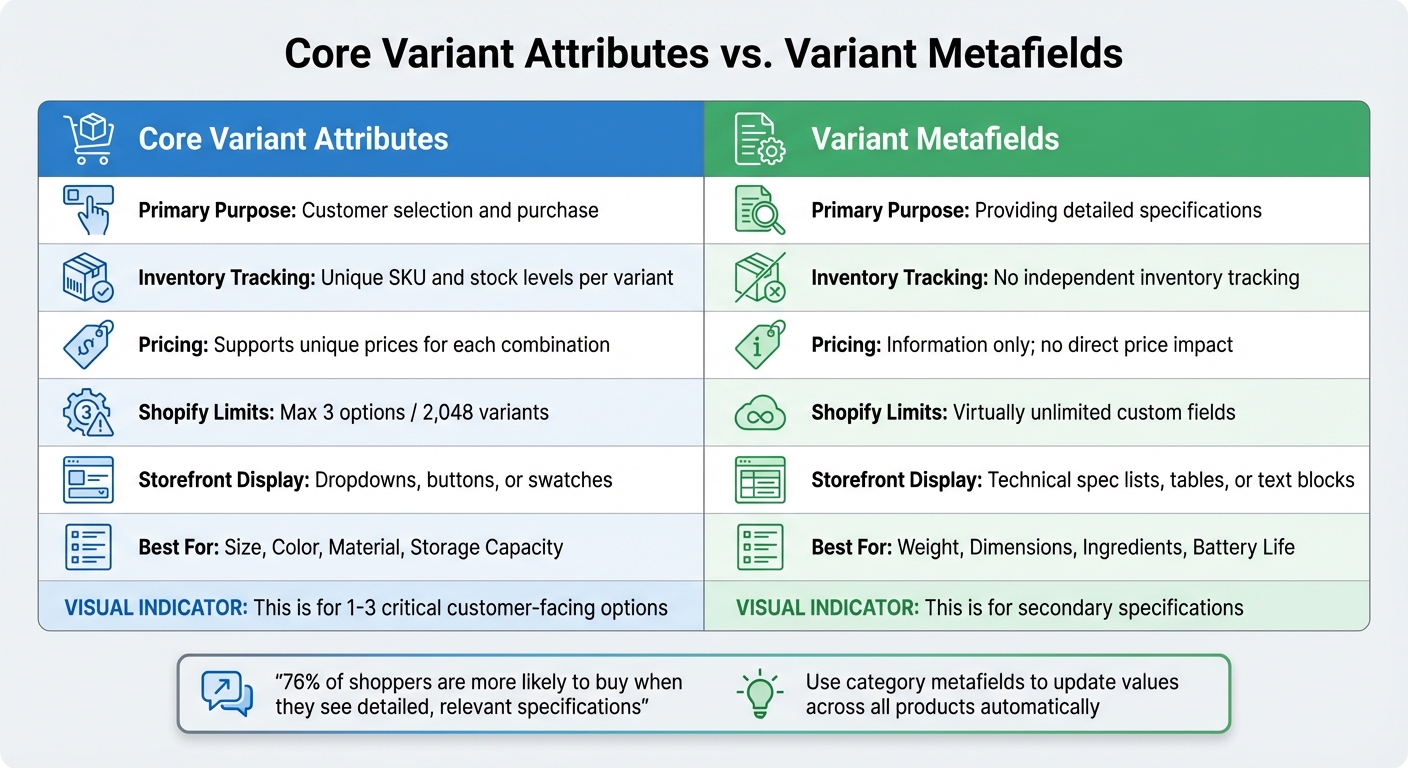
Variants vs. Metafields Comparison
| Feature | Core Variant Attributes | Variant Metafields |
|---|---|---|
| Primary Purpose | Customer selection and purchase | Providing detailed specifications |
| Inventory Tracking | Unique SKU and stock levels per variant | No independent inventory tracking |
| Pricing | Supports unique prices for each combination | Information only; no direct price impact |
| Shopify Limits | Max 3 options / 2,048 variants | Virtually unlimited custom fields |
| Storefront Display | Dropdowns, buttons, or swatches | Technical spec lists, tables, or text blocks |
| Best For | Size, Color, Material, Storage Capacity | Weight, Dimensions, Ingredients, Battery Life |
Conclusion
Having well-organized variant attributes is key to creating a hassle-free shopping experience. When attributes like size, color, or material are structured effectively, customers can quickly filter for exactly what they need, reducing frustration and making it easier to find the right product. This not only makes shopping smoother but also helps lower cart abandonment rates.
Think of your attributes as part of a structured framework. As Performantcode.io highlights:
"Complex Shopify catalogs rarely fail because Shopify lacks features. They fail because the data model underneath them becomes unmanageable".
Using category metafields is a smart way to ensure that changes made in one place automatically update across your entire catalog. This approach avoids the chaos of metafield sprawl, which can disrupt filters and confuse shoppers. By keeping your attribute organization strategic, you simplify your storefront and make ongoing maintenance much easier.
Regular audits are essential to keep everything running smoothly. Tools like FacetGuard (https://facetguard.com) can automatically scan your catalog, identifying outdated dropdown options and inconsistencies in naming. FacetGuard even provides a prioritized list of fixes, helping you address the most pressing issues first and maintain a polished shopping experience.
At scale, a clean and efficient data model becomes even more important. It allows for sustained growth without constant technical headaches or expensive overhauls. Whether you're dealing with a handful of products or thousands, focusing on a few core variant attributes, using metafields for detailed specs, and performing regular audits will save you time and resources in the long run. This proactive approach ensures your storefront remains clear, functional, and ready to grow.
FAQs
What’s the best way to handle products that need more than three options?
Shopify places a limit of three options and 100 variants per product. To work around this, you can opt for a third-party app that removes these restrictions. Another option is to customize your theme code using line item properties, giving you more flexibility in handling product options. If you're dealing with high-variant products, Shopify's APIs can support up to 2,048 variants, offering a solution for advanced inventory management.
When should I use variant metafields instead of creating more variants?
Variant metafields are perfect for including custom or detailed information about product variants that doesn't align with standard options. They’re especially useful for storing internal data or unique attributes. This approach keeps your product options organized and reusable while allowing you to include specific details as needed.
How can I find and fix inconsistent option names that break filters?
In Shopify, inconsistent option names can create confusion and disrupt the shopping experience. To address this, start by reviewing your product options for any discrepancies. You can edit variant options directly on the product details page, ensuring all names are clear, unique, and consistent across your catalog.
If you frequently encounter issues like generic labels or broken filters, consider using tools like FacetGuard. These tools can audit your catalog attributes, helping you spot and resolve inconsistencies efficiently. By maintaining uniform option names, you’ll not only improve filter functionality but also make the shopping experience smoother for your customers.